Fake Freckles 101: Easy Ways to Get That Cute, Sun-Kissed Look
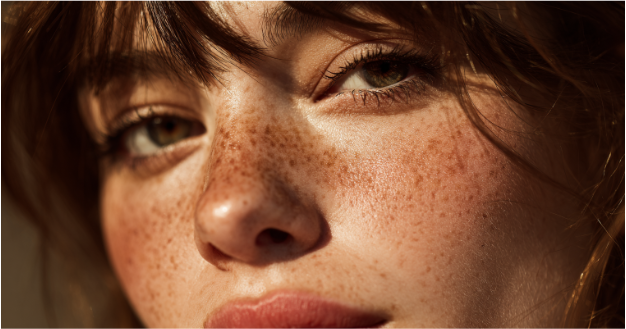
Fake freckles are having a major moment and honestly, we’re here for it. There’s something effortlessly cute and summery about a speckled nose and cheeks. Faux freckles give off that “I-just-got-back-from-the-beach” vibe and add a playful twist to your makeup.
You don’t need to be a makeup pro to get them right. We’ve got beginner-friendly ways to help you get realistic, adorable freckles that will last all day.
Freckle Pens: Your Foolproof Starter Tool
If you’re brand new to faux freckles, a freckle pen is hands-down the easiest way to start. These pens come in natural shades and have precise tips that help you get those little specks just right.
Step-by-Step:
- Prep Your Skin: Make sure your makeup is finished and set and see if your moisturizer is fully absorbed. Prepping the skin helps the freckles sit on top and prevents sliding or smudging.
- Tap, Don’t Draw: Lightly press the pen onto your face and focus on the bridge of your nose and tops of your cheeks. Keep the freckle placement irregular for that sunkissed vibe.
- Blend for Believability: Use your fingertip to softly tap over each dot and blur the edges. Doing so helps the freckles melt into your skin and look natural.

Brow Pencil: Your Everyday Hack
Got a brow pencil lying around? That will do! The brow pencil’s soft tones make it surprisingly perfect for subtle, scattered freckles especially if you’re not ready to invest in a freckle pen just yet.
Step-by-Step:
- Pick the Right Pencil: Go for one that’s a shade or two darker than your skin tone. Don’t use your usual brow shade as it’s often too dark and too bold for faux freckles.
- Dot, Dot, Dot!: Lightly tap the pencil to your skin and create small, uneven dots across the nose and cheeks. There’s no need to overthink the placement because imperfection is the goal here.
- Smudge Gently: Tap each dot lightly with your fingertip or a fluffy brush to soften the edges. Doing so helps the freckles blend in and keeps things looking realistic.
- Quick Tip: For an even softer effect, try the “finger stamp” trick: draw a few dots on your fingertip, then press it onto your skin. This method is quicker and gives a diffused natural-looking finish.
Waterproof Eyeliner: Freckle Fix in a Pinch
A waterproof eyeliner isn’t just for winged liner drama because it can also double as a freckle tool. If you don’t have a freckle pen or brow pencil on hand, this waterproof eyeliner hack will totally save the day.
Step-by-Step:
- Pick the Right Liner: A liquid or pencil liner works well. Go for a waterproof formula in a medium to soft brown and avoid anything black or super bold.
- Test the Flow First: If you’re using a liquid liner, press the tip on a tissue a few times to make sure it’s not too inky. For pencils, sharpen to a fine tip so you can draw the dots as tiny as possible.
- Dot with Light Pressure: Lightly tap the liner onto your cheeks and nose. Press softly and vary your dot sizes. Avoid applying too much pressure or you’ll end up with polka dots instead of freckles.
- Practice Makes Perfect: Try this trick on your hand or a tissue before committing to your face. Once you’re ready, blend with your fingertip or beauty sponge to get convincing freckles.
Henna: The Long-Lasting Option
Want freckles that’ll stick around for a few days? Henna is a great option to get that low-maintenance, sun-kissed look that won’t require daily touch-ups.
Step-by-Step:
- Where to Get Henna or Self-Tanner: You can find henna paste at beauty supply stores, Indian or Middle Eastern grocery stores. You can also get them from online retailers like Amazon or Etsy.
- Use a Bobby Pin: Dip a bobby pin or fine makeup brush into your henna paste. Dot it across the nose and cheeks in varying sizes and spacing for a lived-in look.
- Start Small: Always patch test the henna on a small area of skin to check for any irritation or unexpected color results. Start with fewer dots to see how the color develops.
- Let It Set: Allow the henna to dry completely and sit on your skin as directed. It usually takes 30 minutes to a few hours depending on the formula.
- Remove Gently: Once dry, scrape off the henna gently. The freckles will appear lighter at first and deepen over the next 24–48 hours.
A Speck-tacular Finish: Final Touches for Your Look
Once your freckles are in place, set them with a translucent powder or setting spray to make them fool-proof. And remember, real freckles aren’t perfectly placed, so don’t stress about symmetry.
Ready to glow? Head over to MakeupTutorials.com for more beginner-friendly beauty hacks and makeup trends.
FAQs
- What are fake freckles?
Fake freckles are makeup dots or skin-safe pigment spots applied to mimic natural freckles. - Do fake freckles look natural?
Yes—when applied with the right technique and product, they can look nearly indistinguishable from real ones. - What’s the easiest way to fake freckles?
Using a freckle pen is the easiest, most beginner-friendly method. - Can I use a brow pencil for fake freckles?
Absolutely! Brow pencils work great, especially if they’re close to your skin tone. - How long do fake freckles last?
Makeup freckles last all day with setting spray; henna or self-tanner versions can last several days. - Where should I place fake freckles?
Dot them where the sun naturally hits—across the nose, cheeks, and forehead. - Can I wear fake freckles without foundation?
Totally. They can go over bare skin or a full face—your choice! - Will setting spray help them last longer?
Yes! Setting spray or powder locks them in and prevents smudging. - What’s a good product for fake freckles?
Freck Beauty’s OG pen and Mihenna’s henna kit are beginner favorites. - Do I need to blend fake freckles?
Yes—tapping them lightly with your finger makes them look softer and more realistic.