Makeup Organizer Projects: Turn Everyday Items Into Beauty Storage
Do you often have a hard time finding your go-to lipstick or chasing brushes that tumble off the counter? A makeup organizer keeps every product within reach and your tools neatly in place. Even better, there’s no need to splurge on fancy drawers as you can craft chic storage from jars, shoeboxes, and other household items.
Makeup Organizer Ideas: Clever Upcycle Projects for Your Vanity
Here are 8 DIY makeup organizer projects made from everyday objects.
Glass Jar Organizer
Ever spotted a lonely glass jar on your shelf and wondered if it could do more than hold random odds and ends? A quick coat of spray paint or a strip of washi tape can transform that jar into a chic brush station or pencil holder. Nestle it on your vanity to store foundation brushes beside blending sponges. You can also use it to hold brow pencils or lip crayons.
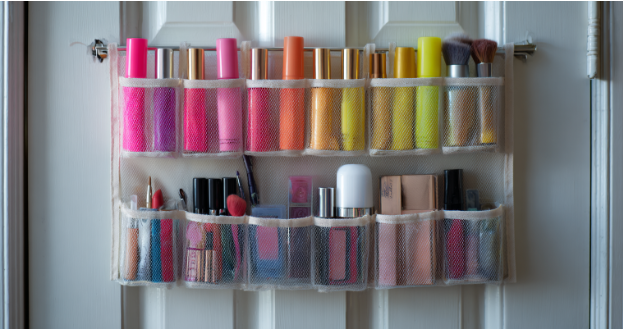
Shoe Organizer

Do you think your shoe organizer only belongs by the front door? Flip it around and hang it on your bathroom wall to turn those clear pockets into colorful makeup displays. Tuck your travel-size palettes into each slot so they stay visible and ready when you’re framing your eyes. Drop in your favorite matte lippies or liquid liners for instant access on busy mornings.
Cardboard Box Drawer Dividers
Do you have a shoebox lying around? Instead of throwing it out, why not jazz it up and transform it into a makeup divider? Cut that box into panels, and cover each piece with pretty paper. Then, slide the divider board into your vanity drawer. You can stash powder compacts or cream blushes in each compartment.
Ice Cube Tray
Remember how you’d pop out perfectly shaped ice cubes without a second thought? Give those trays a beauty reboot by scrubbing them clean and adding a smear of durable paint. You can tuck a single lip liner or a pot of cream shadow into each pocket. Slip the tray into a shallow drawer or set it on your vanity so each well cradles one item.
Tin Can Brush Holders
Leftover soup cans make surprisingly elegant brush stands when given a little design. Peel off the label, then cover the sides with fabric tape or ribbon. Place foundation and blush brushes in one, then use another for spoolies or eye pencils.
Wooden Crate & Bookends Combo
Who would have thought a small wooden crate could double as a tiered makeup shelf? Flip the crate on its side so the open face becomes a shelf, then press bookends firmly against each side to lock it in place. You can arrange powder compacts or skincare bottles inside those levels.
PVC Pipe Lipstick Stand
If you’ve spotted a length of PVC pipe tucked away in your garage, you’re sitting on a makeup storage goldmine. Slice the pipe into short segments and mount them upright onto a wooden board with strong adhesive. Paint the base and pipes in glossy or pastel hues that match your décor and let them dry. You can use the PVC pipe stand to hold your everyday lip colors or those limited-edition shades.
Egg Tray
Instead of tossing that egg tray, why not give it a second life as a makeup sorter? Rinse it clean and add a coat of paint or line each cup with patterned paper. You can store lip liners or arrange mini concealers in the wells.
Makeup Organizers: Clutter Conquered
Isn’t it satisfying to gaze at an organized vanity where each brush and product has its own designated space? Thanks to these makeup organizers, you’ll finally have a tidy counter and less chaotic mornings. Share a before-and-after snap of your setup and tag us on social. What project will you DIY first?
10 FAQs: Makeup Organizer Projects
- What materials do I need for these makeup organizer DIYs?
You only need common household items like glass jars, shoeboxes, ice trays, egg cartons, and basic craft supplies. - How do I prep items before turning them into organizers?
Wash and dry containers, remove labels, and add paint or decorative paper if you’d like a custom look. - Will these organizers hold heavy palettes or bottles?
Most DIY organizers can support lightweight palettes and bottles—just reinforce with extra glue or sturdy bases when needed. - Can I use these projects in a small bathroom space?
Absolutely. Items like vertical shoe pockets or hanging jars help you save counter space in tight areas. - How do I keep jars from tipping over?
Add a weighted base with stones or a layer of modeling clay under the jar to keep it stable. - What’s the best way to line cardboard dividers?
Use decorative paper or fabric glued to each panel’s front for a clean finish that matches your décor. - Can I change these organizers later?
Yes. Most designs are easy to swap out—just wipe clean or peel off tape and start fresh whenever you like. - How do I clean and maintain these storage solutions?
Wipe down surfaces with a damp cloth and mild soap. For paper-lined items, replace the lining if it shows wear. - Are these projects suitable for beginners?
All ideas use simple cuts, glue, or paint techniques—no advanced tools required. Even crafting newbies can nail them. - Where should I place these organizers for best results?
Keep them on your vanity, inside a shallow drawer, or hang them on a wall—anywhere you reach for makeup most often.